Wintersowing Revisited – Letting Nature Take the Wheel
As I mentioned in last week’s column, this wintersowing technique that I have covered each year is a great way for gardeners to get busy in this too-early-to-actually-garden-yet season and with very little effort produces the most robust, hardy seedlings that can be transplanted much earlier than the weaklings that are often the result of traditional seed starting indoors.
Trudi Davidoff, not a horticulture or agriculture scientist, but a home gardener, didn’t have the time, space, or resources to set up a seed-starting operation in her home. She looked at a gallon plastic jug and thought … hmmmm, this looks like a mini-greenhouse. But she didn’t look at these jugs as mere free, upcyclable containers for seeds. The next part still boggles my mind that it works.
She thought of the many seeds that are left overwinter outside from the previous year’s crop, that come up as volunteers the next year — even non-hardy annual vegetables. Take tomatoes or melons/squash, for example.
How can this be? Tomatoes are native to South America, not Siberia. How did these so- called tender, warm-season annual vegetables (and flowers, too, like marigolds) have the strength to survive winter, and then just decide to literally bloom where they are planted?
There it is! The beginning of wintersowing. Allowing nature’s cues to take care of most of what we fret over every year with seed starting. And wintersowing, harnessing the power of Mother Nature, does it better than we ever can.
Seed starting has many nuances, but the principles are fairly simple. And each seed, thanks to the amazing world of genetics, has that all the information of that species’/variety’s hard wired into it without any human’s help at all.
When we start seeds inside, the first order is to count back how many weeks each seed needs to find a starting date to plant the seeds. Then comes the seems simple enough, but requires as much commitment as a new puppy, caring for watering the seedlings and trying to harness enough sunshine or provide a light set up to trick the seeds into germinating early.
Wintersowing eliminates most of that. The same botanical principles apply seeds germinate when they have seed/soil contact, have enough moisture, and most critically, achieves a soil temperature for that seed to know it is safe to come out of hiding.
Where indoor seed starting is creating a false early spring, wintersowing is more tough love. Gardeners are amazed how quickly indoor seeds germinate. On the flip side, the tragedy is the conditions make it too ideal indoors; it is too warm and too comfy, so the seedlings burst out of the soil searching for more light than winter’s short days can provide. So, they put most of their energy into the topside growing taller and taller, while producing few roots.
This scenario is the reason most people stop seed starting at home. They put all this money and effort and especially time into producing these indoor seedlings, only to see them perish when transplanted into the real world — with its constant winds, variable moisture, and temperature.
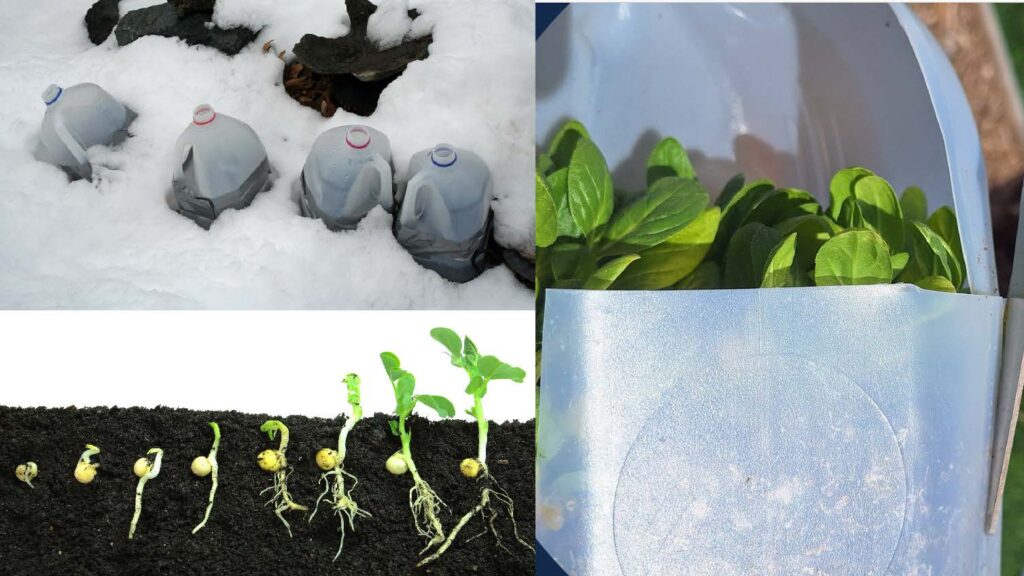
As I said, wintersowing is tough love. Mother Nature is a harsh taskmaster. But seeds sown in these gallon jugs AND put outside NOW through March, end up producing the opposite of indoor seedlings — slow top growth with the most dense and complex robust root system imaginable.
The seeds germinate (by variety) only when nature has increased the temperature warm enough to heat the soilless mix in the jugs, and when enough natural sunlight has increased to sound the germination alarm clock.
Very easy, but very specific differences for the gardener. And not following these five principles of wintersowing, well let’s just say will send you to your local plant vendor buying plants instead.
First the supplies: Not potting soil, not garden dirt, but potting MIX. This light highly drainable substrate is ideal for seed starting. Jugs or containers of any kind that will hold up to the elements. I choose gallon jugs because of their relative durability and I like that I am upcycling. And you can choose almost any seed you want (more on that later).
Next prepare the supplies. Remove the cap of the jug and recycle. Never keep the lid on, how else will it rain, snow, hail, or sleet into the container to keep it moist?
Cut four quarter-sized holes in the bottom of the jug. Drainage is everything. Also, a nice way to get out post-holiday stress. Then this is where the Nancy Kuhajda Wintersowing Jug Cut 2.0 varies from the original style. Opposite the handle, cut a large “U” on the flat side of the upper half of the jug (see photo). Traditional wintersowing has you make a Muppet head/big mac container that leaves just a hinge on one side.
Sure, is it slightly easier to fill? Absolutely but keeping it closed outside in our Midwest winter is extremely challenging. With the “U” cut, it stays closed enough on its own.
The other preparation is to pre-moisten the soil before filling the jugs to the halfway point. You will water again, after planting seeds (which should be planted shallowly, as directed by the seed packet).
Then it is out to the backyard to find a place that gets precipitation (not under eaves) and where the jugs can be secured. That is it!
Now Mother Nature will freeze/thaw, water for you. You only get involved if we have a drought winter (like last year) where you may need to water. When germination occurs, and the plants have two sets of true leaves — so really, really small still — you can transplant them into your garden.
From then on, you will have to monitor watering of these tiny topped/giant rooted seedlings. But then benefits are amazing. Wintersown seedlings often worry the gardener, thinking, how could they ever make it or catch up to a purchased transplant? It is all about that foundation of highly developed roots.
Try it; you will be amazed!