Wintersowing: Let Mother Nature Babysit Your Seeds

Of all the columns I have written for the Farmers Weekly Review, this is one of the top five subjects that I have been asked to cover again. So, start saving those empty gallon water and milk jugs, we are going to start your best seedlings ever with Mother Nature’s help … and very little work on our part.
If you have ever started plants from seed, you realize it is more of a marathon than a sprint. And that marathon can be fraught with problems. I know, it is all about those darn seed catalogs, with their seductive pictures of luscious, mouth-watering tomatoes in every color shape and size. And flowers so beautiful, Van Gogh would be envious.
And everyone is an enthusiastic starter, that first day. But to provide adequate light and just the right amount of water throughout that eight-week seedling development stage, often leaves many gardeners, running to buy pre-grown transplants at the local nursery or the big box store.
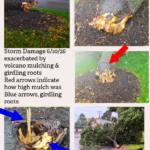
The reason seed-starting inside is so challenging is we aren’t using nature’s way. If we don’t have enough light, the seedlings will stretch out with really weak stems, and the second they are put out the garden, they are too soft and too fragile, and don’t survive.
Indoor seedlings also often are “top heavy” with lots of growth above ground, with limited root systems. Just like a home, a plant is only as strong as its foundation. Real nature is slow as she grows.
Our plants outside “know” when it is time to start growing, for the most part. This is hard-wired genetically into them, and it is the soil (not air) temperature and increasing amount of daylight that signal the plants to start to grow.
Inside, we are trying to replicate growing conditions that are more like spring. We can’t plant tomatoes outside by seed; the soil would need to be 70 degrees before they would even germinate, getting us our first tomato, just before frost. So, plants in the Solanaceae (sun-loving) family need to be jump-started eight to 12 weeks early.
Wintersowing is the flip side of greenhouse or kitchen counter growing. It uses nature’s clock and moisture to grow the sturdiest, stocky, giant-root-system plants you have ever seen. Truth be told, I didn’t think it would work. But after a few modifications, I will never start seeds inside again.
This process was developed by a homeowner who didn’t have the money, time or space to start seeds inside. She looked at a gallon translucent jug and thought, ‘Hmmm … a mini greenhouse.’ So, by experimentation, like any good scientist, she created wintersowing.
Wintersowing doesn’t seem real to the average gardener. We were all taught about the hardy plants, the half hardy and the tender. Plant seeds need a certain window of time, temperature (most importantly), moisture and light to crack the code to open the seed and start growing.
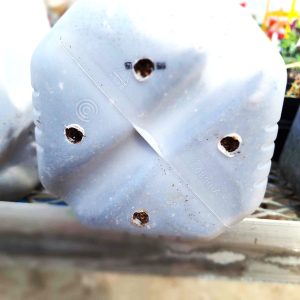
Wintersowing is a simple process: Take a gallon jug that is translucent or clear. It cannot be opaque. Light has to be able to get through. You make at least four large drainage holes (dime-sized or bigger) in the bottom of each jug.
Then, in my modification, you will cut a U-shape on the upper surface of one of the sides of the jug to create a garage door. It is a flap large enough to put your hand in to plant. If you google wintersowing, you will see the jugs cut all the way around on three sides, kind of like a Big Mac container or Muppet’s head. The reason I modified the cut is the biggest challenge of wintersowing is keeping the jug closed for the entire six-12 weeks as it sits outside in the elements. People have tried tape, wire, yarn and a variety of closures. But Mother Nature’s fury of Midwest wind often weakens those closures, and the jugs open, and the greenhouse effect is lost.
Also, any label that you wrote on the outside of the jug or stick with the name of the seeds you put inside the jug have now blow away. Whatever seeds do survive are now in the witness protection program until you figure out which ones are which. I guarantee you, the garage door flap method prevents all this.
Now the most important part, be sure to take the cap of the jug off. You will NEVER put the cap on again, so recycle it. The top hole is the way the rain, snow, sleet and ice get in to water your seeds. Last year, some people reported their wintersowing failed, and it was because they kept the caps on.
Fill your jugs to their “waist” — halfway up — with pre-moistened potting mix (again, not potting soil nor outside soil from your back yard). You pre-moisten the potting mix the night before by pouring a few cups of water into the potting mix bag. The feel you are looking for is a hydrated, wrung-out wash cloth.
After you put the soil in, time for seeds. Shallower the better. We tend to always plant too deeply. Seeds should be planted only as deep as they are thick. So, for marigolds, they are the size and shape of eyelashes, just barely covering.
After planting, take a Sharpie and on the INSIDE of the garage door flap, put the name of the plant. Then find a place outside where the elements CAN get in. So not under an eave, and then literally let nature do the rest. Water one more time thoroughly. Then do the Ron Popeil, “set it and forget it…”
Next week, what to do when the your wintersowing jugs start to sprout.